Technical Tip
Before you post the batch, check that the Balance Inc GST and Receipt Inc GST fields balance. Micronet then reflects correct average costs for your items, and correct GP% on sales.
Use this option to post the goods received batch as costed if you have received the items with the supplier’s invoice. You can only use this option if you entered an Invoice Number on the Goods Received Header screen.
|
|
|
Technical Tip Before you post the batch, check that the Balance Inc GST and Receipt Inc GST fields balance. Micronet then reflects correct average costs for your items, and correct GP% on sales. |
Refer to "Goods Received Processing Overview" for the steps involved.
If the amount being received does not equal the total of the line items entered (i.e. the Balance Amount does not equal the Receipt Amount), Micronet displays a warning asking you to confirm that you want to proceed.
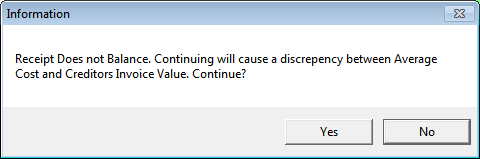
If you select Yes, Micronet processes the batch and posts it as costed.
|
|
|
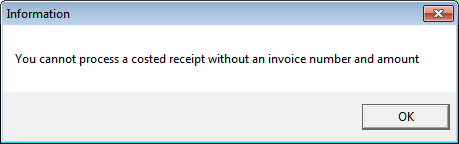
Technical Tip If an invoice number or invoice amount has not been entered for the batch and your user ID is set to prevent blank invoice numbers, Micronet displays the following message:
Select OK then display the Goods Received Header and enter the invoice number and/or invoice amount. Refer to "Maintaining the Goods Received Header". You can only leave the Invoice Number field blank if the Prevent Receipts Without Invoice field on the User File Update screen - MDS Security tab is set to No. Refer to "Maintenance - Edit UserIDs - 4. MDS Security". |
|
|
|
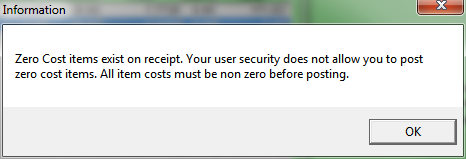
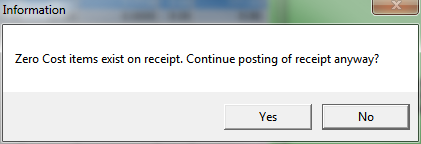
Technical Tip 2.8 Feature If the batch has any item lines with zero values, Micronet will display one of the following messages depending on your user security:
If the first message is displayed, you need to go back to the item lines in the goods received batch and enter the correct costs. If the second message is displayed, you can choose to continue posting the batch with the zero cost items. Whether or not you can continue posting a batch with zero cost items is set in the Disable Posting of Zero Cost Goods Receipts fields on the User File Update screen - MDS Security tab. Refer to "Maintenance - Edit UserIDs - 4. MDS Security". |
|
|
|
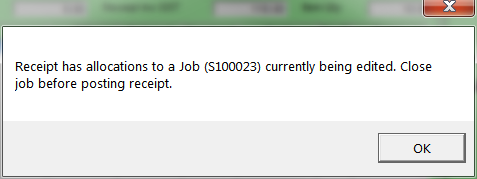
Technical Tip 2.8 Feature If you are receiving an item that has been allocated to a job and that job is open in MJC (e.g. it is being edited by another user), Micronet displays the following message:
The job must be closed in MJC before you can post the goods receipt batch. Alternatively, you can hold the goods receipt batch (refer to "Goods Received - File - Hold"). In addition, if the job is in a status which does not allow changes (e.g. Inactive or Closed), Micronet will display a warning that the goods will go into stock instead of posting to the job and asks if you want to continue. This warning is also displayed if the job is still active but a specific line on the job has been processed using Post to GL for internal jobs (refer to "Internal Job Entry - File - Post to GL") or Transfer to MDS for manufactured jobs (refer to "Manufactured Job Entry - File - Transfer to MDS"). |
|
|
|
Technical Tip 2.8 Feature If your company is using the Procure to Pay feature to capture freight values from purchase orders through to goods receipts on PDAs and in Micronet, and the freight charge on the goods receipt batch is greater than the freight charge entered on the purchase order, Micronet displays the following message:
If you select Yes, the goods receipt batch will be posted with the freight overcharged. The variance will be posted to the Variance account in the General Ledger. If you select No, the goods receipt batch will not be posted. |
If the PRINT MRF REPORT option is selected on the Goods Received screen (refer to "Goods Received - Edit - Print MRF Report"), Micronet displays a message asking if you want to print the MRF Order Receiving Report.
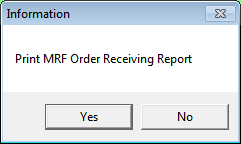
If you selected Yes, Micronet displays the Select Output Device screen.
|
|

|
Reference For more details on these options, refer to "Selecting the Output for Inquiries and Reports". |
Micronet prints the report (if selected) and redisplays the Goods Received screen.